10 Baby Essentials for Baby on Board

While in preparation for this little bean-to-be, I’ve put together a list of my TOP TEN essentials that I’m going to make sure I am digging out of storage for this wee one. After having Ez, I quickly learnt that have one of everything wasn’t what she needed, nor did we have the space for it all! (lol) Through it all though, these are the gems that have stood out the most and helped in our biggest times of need and late nights.

When on the road, going for a walk or finishing up your grocery list, these are a few favourites I do not leave the house without!

IMG_2799-2

1. Binxy Baby Shopping Cart Hammock – One kid in the seat and one in the hammock. This is an item that is new to me! I have seen them popping up everywhere I go and am eager to try it out! With a defiant toddler, I don’t think I could convince her to lounge in the hammock as I shop. Staying put in one spot is not her strong suit. The Binxy Baby Hammock is designed for you to be able to shop hands free and leave the baby comfy and well rested. Whether that be in the hammock itself or in the car seat resting on top of the hammock (strapped in of course), still leaving that room for you to fill your shopping cart! Again, this will be a new item for us, but with a toddler, I’m putting together the most foolproof plan I can for baby #2!

2. Beluga Baby WrapTHE perfect baby carrier to help you live hands free. I honestly don’t think I could live without my Beluga Wrap. Haley, owner and creator of BB, has saved me time and time again with these amazing ONE piece’s of fabric. The luxurious 4 way stretch of the bamboo, beautiful prints and colours, and one of the best parts for me, how fast and easy it is to wrap! (The fact that her wraps ALSO can look like a part of your wardrobe – unbeatable!)

3. Baby Bear Designs – Pacifier Clip – Losing a soother is no fun for anyone. Up until Ezra was about one year old, her soother was always on a clip, no matter where we went. In the wrap, in the stroller, in her carseat, always on a clip! The chew beads that the clip is also strung with provided an extra teething tool for her in her fussy moments. Go take a look at their wide selection of colours and patterns – Amy even puts together custom orders just for your little one!

Below are a few of some tried and true items to help babe  sleep better, at home, in the crib or just in your arms.

4. The Ollie Swaddle Helping with those long nights and keeping baby snug through the night. When Ez was born, I actually never used a swaddle or anything that resembled it. She was defiant and determined to always have her arms flaring and toes up in the air. Although, she slept that way, so I can’t be angry about that! This time around I am hoping to have all hands on deck, including old-tried and true items but also new ones to try out. Being our second born, I have a small inkling that I will need all the help I can get! Two of the things that draw me in to the Ollie Swaddle is the unique fit it offers to every child and the easy access for diaper changes! I am looking forward to trying this tactic out – What about you? Did you swaddle your babes? How did it go? Let me know in the comments below!
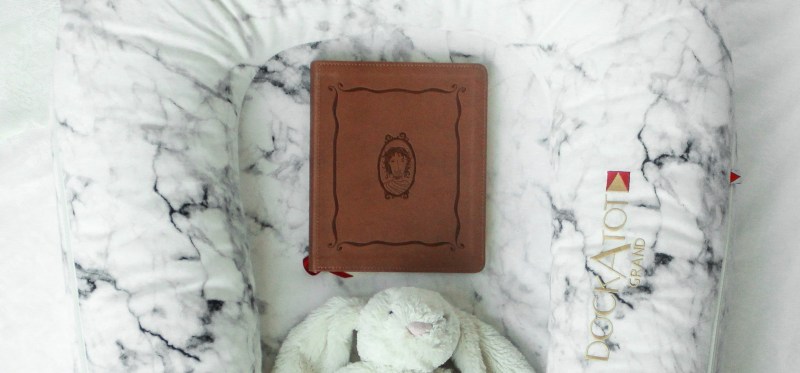
5. Dock A TotA spot to call their own, one for sister and one for little. Since we received our DockATot, Ezra has not gone a day without lounging away in it. It is by far one of her most treasured items, as it is her own. It is not a space on the couch or a chair at the dinner table, it is her own little nook that she reads books, builds towers, and cuddles with BunBun. If anyone were to come over, you bet that she’ll inform you right away who’s ‘bed’ that is in on the floor covered in blankets. Soon there will be another little one to share this space, but for now, Ezra will gladly soak up and snuggle in.

6. Jelly Cats Stuffed AnimalEvery little babe has their own special stuffy, meet Bun-Bun.

7. Modern Burlap A light, breathable blanket to cuddle or layer with. When Ez was born, she was gifted the month of May from her Auntie Shannon. We used it for milestone photos, a soft surface for diaper changes while on the go and to wrap her up in when it was time to nap. To this day, her Modern Burlap blanket is a keepsake we will hold on to forever!

Last but not least, an item for healing, an item for feeding and an item to use in four different ways!

8. So Luxury Sitz Bath + Milk Oat Bath SoakAdding a little bit of luxury with the healing remedies of the glorious Oat Milk Bath and Sitz Soak. So Luxury also is my absolutely favourite brand of bath soak for Ezra. Not only does this soak smell and feel amazing, there is such a nutrients and healing power in this soak that it clears the reddest of little bums! 

9. Daisy Pops BreastfeedingComfortable, functional, and silky soft breastfeeding shirts.

10. Little Bean Threads All Over Cover – Multifunctional from car seat cover, nursing cover, scarf, or stroller cover, LBT has got you covered.

IMG_2762-2

Personal Essential – Jesus Storybook Bible: Our home runs on three things, Love, Coffee, and Jesus. One of the staples in our lives is our faith and bringing up our little ones in these footsteps is the most essential thing to us. After Ezra was born I found a picture bible for her (and whoever came after) that had colourful pages but still explained each story on a level she would understand. Watching her explore and figure out the stories on her own is so precious. 

__________________________________________

BONUS : Mommy Essential

1. Cake Maternity – A beautiful nursing bras that doesn’t completely make you feel like a milk maid! I am looking forward to wearing this bras with pride and a little bit of secrecy, knowing there’s something pretty and lacey underneath!

2. Belly Bags – When your mommy brain just isn’t working how it used to, they’ve got you covered with everything you’ll need from hospital to home.

3. Pink Blush Maternity – Items for you and your bump that you’ll feel beautiful in before AND after baby! When I first heard of Pink Blush Maternity I was intrigued, fashionable, functional AND I can wear it through my entire pregnancy? Does such a thing exist?! YES it does. Maternity dresses, Maternity Robes, and even more for mama and baby with amazing durability and flexibility. This dress pictured below is one of the items I own from them and I can say without a single doubt, I am over the MOON about the quality and support this company gives. They have everything from jammies to formal dining wear, yes, formal dresses that are MATERNITY! There is such a large variety of styles and sizes for each season, I wish I had known about them when I was expecting my sweet little girl two years ago!

If you’re looking for the dress pictured below – click here!


Well, that’s all I’ve got for you tonight! Hopefully you came across something that you discovered for the first time or learnt more about it! Don’t forget to leave a comment below, I would love to hear some of your own suggestions on what helped you the most with baby number one and what you found wasn’t necessary/crucial for baby number two! 


XOX – A very tired mama

2 Girls and Their Dolls – American Girl Review

Since Ezra was born, her and her cousin Maisie have been inseparable. At the beginning it was an un-dyeing love that Maisie had for this new little baby girl that was all hers. This love then it grew and grew as Ezra began to crawl, babble and say ‘MAIZEE’ with the biggest smile. Even though there is almost four years difference, they still find ways to play together, laugh and connect on the same crazy level!

We are very fortunate to live so close to Ezra’s cousins and that she is able to see them at the very minimum, once a week. In a sense she is growing up with her cousins more as siblings, the bond they all share is so strong. Ez will go through all of her cousins names, and her aunts and uncles at LEAST 5 times a day, wether we be in the car and she hopes were driving to their house, or just at home sitting on the couch.

Ez is so funny with her eldest cousin Maisie, she will see her and instantly start to vibrate, run up to her and give her the biggest hug while chanting MAISIE! MAISIE! MAISIE! Maisie will run over to Ez, swoop her up in her arms and twirl her. There is such a look of pure joy and love when they see each other, you can’t help but smile along with them.

When I first started working with American Girl, I was thrilled to be able to give Ezra one of their beautiful dolls. Not only did I just find out that I was pregnant and that this would be so fun to gift her a ‘practice’ sibling, but to watch her grow and change and show the same love and care that we pour in to her each day. I then started thinking of that same love that she exudes when Maisie is around and how fun it would be if they each had their own American Girl to play with on their playdates!

I knew that Maisie loved her dolls and barbies and that she would love her Camille Doll and the Garden Party Table and Chairs accessories. She loves fairy gardens and dresses, so this was the prefect fit for her! As for Ezra, I found the Bitty Baby that looked the most like her when she was born, very dark features, a head of hair and in her jammies! Along with Ez, we received the Bitty Better Kit, a doctor kit for her Baby, Ez is so compassionate and caring that this was such a good addition for her, and plus, it came in a ‘purse'(doctors kit), Ez’ favourite thing to carry around right now haha!

When the girls first opened their dolls, they were both shocked, and instantly in awe of these beautiful little girls, all dressed up and all theirs! They could barely keep it together while we unpackaged them for them. (Note to self: Prep and un-package all tags next time I am gifting an item to a toddler!). As they started to play with their new American Girls, I brought out the other items for them and it happened all over again! the OO’s the AHH’s and the ‘I Love It!’ was all over the place. It was a little bit of a rough start, as the girls both received brand new toys at the same time and wanted to play with each others gifts.

They worked it out in the end and played for a couple hours going back and forth and obviously ending the playdate with a dance party!

IMG_2174-2

Thank you so much again to American Girl Dolls for these gifts for my favourite girls! They will enjoy them for years to come and we are excited for Ezra to have her very own baby doll to take care of in a quick six months!

XOX,

Cass


SG Harvest Feast – When you have all that you need, build a longer table.

From the bottom and top of my heart I want to thank each and every one of these ladies for being apart of the Harvest Feast. It was such a perfect night, an evening one could only dream of. I left there in pure bliss, unsure of if I just walked out of a day dream, because that couldn’t have been reality. The amount of raw emotion, pure community and utmost vulnerability overwhelmed me. This was the whole reason I wanted to host the event, this was the passion and driving force behind it all. I firmly believe that there is always time to rest, no matter how busy. Let it be cherished and sought after! We seem to be so busy with our lives, blogging, business’ and networking it’s hard to find these face to face times, and it needs to happen more! 

Thankful. Thankful for a foundation of trust, community, leadership, guidance, perseverance and the love that embodied that Saturday night. The women who attended, the dreams that were dreamt and the goals that were set.

One evening I thought to myself, what brings me joy? Community. Getting to know people. Experiencing life together. This is how I chose to continue and build off leading and living a joy filled life.

The Harvest Feast has been a dream of mine that I didn’t think was attainable. I was nervous, I was a bit lost and frankly, I was scared. What if I do all this work, time in to contacting companies and they all say no, or it doesn’t work out, or no one wants to come. Stop it, I told myself. I want to do this, I need to do this and I am going to do this. And as I reached out, I found myself empowered with the encouragement and guidance from companies, partnerships, and many boss ladies out there, Saturday, October 7th, came.

We laughed, tears fell, and we dug deep into each other’s roots and grew so much closer because of it. I am BEYOND proud to say that this is just the beginning. Evenings like that need to happen more. I would be honoured to explore and conquer this journey of bringing the women we so often see on social media, up on the stage at events, and selling their pride and joy in their product at markets, together. To rest in community, be vulnerable in our fears and discomforts, and be strengthened in joy and love.

I could try for hours to put in to detail of how the evening went, what the vibe and overall feel in the room was, but I wouldn’t be able to bring it justice. How GOOD it felt to just rest and be with each other. To let all the walls of ‘looking our best’ and ‘best version of us’ in front of everyone, down, and to simply just BE. As the evening went on, I discovered that there were all sorts of women gathered at the table. There were Entrepreneurs, Mothers, Hikers, Artists, Photographers, Writers, Bakers, and so many more amazing qualities to discover, that you would never have stumbled upon if you hadn’t taken the time to sit and just be with each other. Face to face and heart on our sleeves. There was an overwhelming sense of comfort that embodied and surrounded the room that evening, whispering, it’s okay to share, it’s okay to let them in, it’s okay to feel sadness and joy. It’s okay.

“Eucharisteo: Thanksgiving, to be thankful. ⠀
I opened the door to the Secret Garden and my eyes were placed upon a setting that was delicately set up with love and passion. A passion for a night where women could gather together intimately and share our hearts. We were created for connection. That longing that you feel was put there on purpose. It was placed just as delicately, passionately and purposeful like that table before us. I didn’t want it to end. My soul thirsts for truer, deep-rooted connection. Sharing our hearts and our dreams, our struggles, and fears. How can we shift our priorities to ones that matter most without being deceived by the things that don’t? To be thankful right where we are but also with a vision of moving forward? ⠀
Refinement. Sanctification. This continuing of being molded by the potter’s hand and being thankful for the process. Humbly let go. Let go of trying to do, let go of my own fears. Let God blow His wind, His trails, oxygen for joy’s fire. Leave the hand open and be. Be at peace. Bend the knee and be small and let God give what God chooses to give because He only gives love and whispers surprised thanks.“⠀- Shannon – Adventurous Mama

Here’s to the first annual Harvest Feast and the many more that are to come!

VENDOR/SHOP LIST

Styled & Curated – Stumbling Grace Blog

Photographer : Tallya D Photography

Decor

Autumn wispy wreath – Bloom Bloom Room

Letter Board – Letter Peddler  

The Flores Towel/Blanket – Tofino Towel

Window Pane, Chalkboard, China Plates, Golden Frame –  Stumbling Grace 

Floral décor on golden frame – Vintage Meadows

Chalkboard lettering & Window Pane lettering – Hand Lettered by Bev

Decor & FurnitureJubilee Collection

Dessert Table, Silver Platters, Copper stand, Copper Chandelier , Menu stand, Large gold chalkboard stand , Rugs , Tea light candle holders , Glass Terrariums (on dessert table)

HYGGE Wooden Cut Paper Heart Calligraphy

Sweet

Salted Caramel Popcorn & Pretzels – Batch Sweets

Macaroon’s & Cake Pops – Cakes’nSweets

Earl Grey/Lavender Cookie & Blueberry Scone – Crème de la Crumb

Savoury

Mennonite Sausage Ring, Kolbassa Sausage Ring, Capicolla Toppers, Cervelat Toppers, Original Pepperoni Bites, Festive Ham – Grimm’s Fine Foods

Maple Smoked Indian Candy Salmon , Beef Jerky , Smoked Salmon Lox – West Coast Salmon

Bread & Dips – A Bread Affair 

Sweetheart Loaf , Three’s Company Loaf , Marquee Loaf , Sourdough , Baguettes, Roasted Carrot Dip , Beet Dip , Cranberry & Pecan Dip, Chocolate Croissants

Sip

Fortunello & Oat Porter – Four Winds Brewery

Growlers of Cream Ale & Sour Weisse, MB glasses – Mariner Brewing

Homemade Apple Cider – Stumbling Grace

Table Setting

Invitations, Name Cards, Menus – AylaPena Calligraphy

Table Greenery & Greenery on dessert table – Maple Ridge Florist 

Candles – Wood Lot

Live Edge Wooden Table – Gilbert Built (Jubilee Collection) Instagram : @gilbertbuilt

Stop Buggin’ Spray – K’Pure  

Lavender Bouquets & Gather Tags – Grow & Gather Farms

Table Settings & Decor – Pretty Things Rentals

Wine Glasses , Moscow Mules , White Cloth Napkins , Curtain Backdrop , Eggplant Table Runner, Golden Candle Stick holders, String lights

Wooden cutlery – Joonie&Joe

Takeaway

Pumpkin spice cookie jars – Jars by Jodi

Woodlot Soap Bars – Wood Lot

Venue Location : The Secret Garden’ at Woodbridge Ponds

If you yourself are looking to put together your own event or even would like to partner together in making something magical come together please send me a message, I would LOVE to create a unique space with you! Let’s chat! You can find my contact information above ^^

GUESTS

Cassandra – Stumbling Grace Blog

Chalie – GOLDNgrasses

Diana – Happy Bees Events

Jen – Little Sprout Creations

Kayla – The Jubilee Collection

Natalia – The Venture Creative

Samantha Lenz – Oh Samantha! Blog

Shannon – Shannon Lee Blog

Tallya – Tallya D Photography

If there was anything that was used in this party you fancy and would like to inquire for yourself, I have listed all the links you will need to find the local and creative community that poured in to this event. 


Cheers loves! and here’s to many more.


XOX – Cass


6 Foot Gingerbread House (cardboard; not cookie)

One thing that I really do miss about my life before I had Ez, was working as a preschool teacher. Being able to create different play spaces for the children each month and theme related to what they would be learning about. Now that Ez is a little bit older and I am able to play with her more and more, running around the house, peek-a-boo and imaginary play!

How excited was I when the huge rollout for Starbucks’ Holiday merch came in and there was 2 GIANT boxes and endless others. I couldn’t help but take them home, already having the dream of one day making Ez a giant box fort. Then the holiday season rolled around, it completely embraced me and here we are!

Ezra’s Gingerbread House

Materials

  • 2 Extra large boxes / 2 medium / 2 small
  • Exacto Knife
  • Duct Tape
  • Clear Tape
  • Red / White Acrylic Paint
  • Paintbrush

STEP 1 : B O X E S

The first thing you want to do is find two large boxes, about the size of a mini fridge or an ottoman, for your base. You can use smaller boxes and attach them together, but in my opinion, if a toddler is running through it, you need some sort of stability! THINK B I G. I taped them together at the top to get ready for the next step! TIP : I got my boxes from Starbucks, you could also go to furniture stores, that way you know the boxes are clean and dry! 

You may also like LEGO of your DIY fears

Step 2 : T R A C E  I T  O U T

The second step is to trace out how you want your house to look. Pinterest, google, search out different ideas for what you want to create. I chose to do two windows, different shapes, a chimney and a door. TIP: When I was sketching out the shapes for the roof and window, I did it from the opposite side that would show on the outside, so it didn’t matter how many times I re-drew. TIP #2 : Find an item in your house to trace some of the more finer pieces. i.e. large whicker basket for the roof window. 

Step 3 : M A K E  T H E  C U T

After you have all of your pieces ready and sketched, it’s time to cut them out. I found that it was really hard to cut across and so simple to cut top to bottom because of the grooves in the board itself. But at the end of the day, the only one judging will be your child, and there will only be screams of joy! Remember to make the chimney and the mailbox. TIP : I cut all of the pieces out and cut the window slots afterwards, it was too awkward to try and cut little squares out of a large piece of board!  

CHIMNEY : When you are making the chimney, it’s tricky to get the right angle so I suggest cutting it out how you think but make it EXTRA LONG so then when you need to adjust and trim, you have space to.

You may also like : Canadiana Styled Shoot

SCALLOPED EDGING : I made this separately after I had completed the base of the house, I had some extra pieces. It was really on a whim, just remember, bigger is better, more playful and play-like!

Step 4 : R E I N F O R C E

You’ve cut all the edges and pieces, now to reinforce any extra pieces that may need to stay folded or bent a certain way. I used TONS of duct tape here and clear tape for the outside. TIP : I used other pieces of cardboard to make those long straight lines to make sure they would be equal

Step 5 : P U T  I T  T O G E T H E R

When I was putting it all together, I actually had to reinforce a couple pieces with an extra piece of cardboard on the inside of the roof. I used only duct tape on the inside for extra support and clear on the outside. TIP : Save the roof until last, you will want to paint it first and separately. Already being attached to the house is too awkward!

Step 6 : P A I N T

Paint the roof first, you can do lines, scallops or even bricks if you like! This is also the time that I painted the chimney and entire scalloped trim so that it would be dry by the time I was done the house. Paint the edges of the home, doorway, window frame and any other additions on the house. When I painted the chimney, I painted all the edges and then let it dry and sized after. Don’t forget about your little mailbox!

Step 7 : E N J O Y

Fill your gingerbread house with teddy’s, plush blankets and everything cozy! One thing that really brought this Gingerbread House home (even though I don’t think I’ve ever added one on a cookie house) was this amazing fire play set from Nixilauroo. (The marshmallow has a MAGNET in it to attach to the stick!! – MIND-BLOWN) Head on over to their site and check out the HUGE variety of play sets they have, colours and even prints! And if you’re still perusing through after the fire sets, search for their brand new teddy bear hoodie. You won’t be able to resist! I know I couldn’t!

IMG_8347

Take care and enjoy playing in your gingerbread houses! Please tag me on insta @stumblinggrace and let me see YOUR creations you’ve made for your littles. I would love to see your creativity and have some inspiration from you!


XO Cassandra

Homemade Apple Pie – Recipe

The classic homemade Apple Pie. Today I am going to share with you how to make this Holiday Staple. Start off by picking up some hard, tart apples, Granny Smith or maybe Honey Crisp are great! The best part about this recipe is that there are only 7 steps and you will only need TEN ingredients, and most of these are already sitting on your shelves!

You may also enjoy : The Best Butter Chicken

Ingredients:

  • 2 batches of my one minute homemade pie crust (or 1 if you roll it out very thinly!)
  • 7-8 small granny smith apples, peeled, sliced, and cored
  • 1 stick butter
  • 3 tbsp all-purpose flour
  • 1/4 cup water
  • 1/2 cup white sugar
  • 1/2 cup brown sugar
  • 1 heaping tsp cinnamon
  • 1/4 tsp nutmeg
  • 1 tsp vanilla

1). Place the peeled, cored, and sliced apples in a large bowl. Set aside.

2). Preheat oven to 425F.

3). In a medium saucepan, melt butter over medium heat. Add the 3 tbsp of flour and mix well, forming a paste. Add the water, sugars, cinnamon, nutmeg, and vanilla and mix well. Bring to a boil for 1 minute, then reduce heat to a simmer for an additional minute.

4). Remove from heat and reserve about 1/3 cup of filling for pie crust. Add remaining filling to apples. Toss well.

5). Pour apples into prepared pie crust, mounding slightly. Top with second pie crust (lattice design, etc). Brush the remaining 1/3 cup caramel filling over the crust.

You may also enjoy : Keepin’ comfy no matter what hat I’m wearing

6). Cover the pie loosely with aluminum foil. I lightly spray the foil so it does not stick to the pie. Place the pie on top of a cookie sheet (to catch any drips) and bake at 425F for 10-12 minutes. Reduce the heat to 350F and bake for another 50 minutes (remove the foil the last 10 minutes to let the crust brown), or until done.  The pie is done when the crust is golden-brown and the apples are soft when pierced with a fork.

7). Allow the pie to cool before serving. Enjoy!

Serves: 8-10 people.

Recipe adapted from: http://allrecipes.com/Recipe/Apple-Pie-by-Grandma-Ople/. 

Adapted recipe courtesy of Audrey’s Apron.

Mini Pie Bites (or deceiving sausage rolls)

After I had put the filling in to the pie crust and noticed that I had some left overs of the filling and the dough. I quickly cut up another apple and made little triangles of dough to wrap with filling for small like apple bites. It was a complete on the whim experiment but it worked out! I put them on a small pan beside the pie and let them cook about the same time as the pie – checking on them every 20 minutes or so though!

Enjoy!!

I would LOVE to hear your favorite fall time recipes and if you have ever experimented with your very own apple pies! or better yet, created apple bites yourself lol!

XOX Cass


1-2-3 – Roll! Your easiest pie crust yet!

Homemade Pie Crust? WHO has time for that?! Why you do of corse. With this simple recipe, you’ll be making this pie crust in your sleep, especially after you bite in to it! When I first started thinking about making my first pie a few years back I assumed I would just pick up a ready made pie crust from the grocery store. Nope. Apparently I married in to a connoisseur of all things baked/cooked from scratch.

You may also enjoy : Top ten gifts for the mom who does it all

To get started here, always remember to wash your hands and take off your rings! Does any one else have a small trinket dish that they use when baking/washing hands/doing chores that they use to keep their treasures? Below you will see my place of choice. It is called the ‘Trinket Dish” from Three Corners Artisan.

Trinket Dish - Three Corners Artisan

You can find the Trinket Dish HERE.

Having a husband who avidly searches to cook new things is definitely not a problem for me! My husband is constantly showing and teaching me new ways to cook things, how to tell if something is done (or overdone, whoops!) and that sometimes it really is easier to just make it from scratch! Hence, this simple 3 step pie crust recipe. Don’t be intimidated! If I can do this, you can do this!

You may also enjoy : The Best Butter Chicken Sauce

4 Step Homemade Pie Crust

Ingredients:

  • 1-3/4 cup all-purpose flour
  • 1 teaspoon sugar
  • 1-1/2 sticks butter (12 tablespoons), cut into slices
  • 1/4 cup + 2 tbsp ice water

1) Mix flour and sugar in bowl.

2) Add about half of the butter.  Add the rest of the butter. Blend until the mixture turns into coarse crumbs (small pea size).

3) Slowly add the ice water and pulse until the dough gathers up into a ball.  If it doesn’t after a few seconds, add a few more drops of ice water until it does.

4) Take the dough and flatten it into a disc and place it on a sheet of floured plastic wrap. Refrigerate for about 30 minutes before rolling. Remember to use the plastic wrap trick from below!

If you’ve got any tricks up your sleeves on how to make pie crust, different designs or just want to share your experience with this recipe, let me know below in the comments! I would love to hear from you, and get new ideas! 

Happy Baking!

XOX – Cass

(Check out my 3 extra tips below to easier pie dough making!)

Pie Crust 101

3 Tips to the easiest pie crust!

Tip #1 : One thing that I did see online, that I did not have but would love to try one day, is someone suggested using a food processor to mix and blend the butter into your flour mixture. I took the rustic path of the pastry blender. 

You may also like : Canadiana Styled Shoot

Tip #2 : When rolling out the dough to get it ready for the pan, place a piece of saran wrap overtop and underneath of the dough before pressing the rolling pin down. This will make your life, and washing time, so much easier! The dough will not stick to the rolling pin and will be a nice quick wrap up and toss when done.

Tip #3 : Once you have refrigerated and rolled out your pie crust, you can decide how you would like to form it. I always love the classic look of pinched edges and a lattice crust, but you can be creative! Remember, rustic is okay here: you want your pie to look homemade!


Keeping comfy, no matter what ‘hat’ I’m wearing

_MG_6386

Oiy Vey. I feel that this past month has hit me like a rock. I recently upped my hours at work and have been going almost all in with 35-40 hours a week. It’s been killing me. The last few days Ez and I have been taking a bit of a break from the rest of the world. Yes the weather has implemented this, and yes, it was a dream. Having these last couple days with her and just the two of us has been good to my mama soul. Not being around this little bean is tearing me apart. So this weather, even though it has force-cancelled exciting plans, it has filled my cup with love and cuddles.

Being a busy mom on the go I often am running around in joggers, tanks and sports bras. (I know you I’m not the only one! Right?) I recently received the Gleaming Bralette from @ethona.casey and am in love! The fun design on the front, criss cross support in the back and extra padding in the front (Mama likey!). This easily brings this bralette to the top of my list of go-to’s for a day at home, on the run for errands or simply going for shoppi… for a run.

I feel like maybe I’ve just never found a sports bras/bralette that fit me just right, thus steering me away from them. Even when I was in high school, I would wear my regular bras during gym / sports (Ew. now that I think of it haha!). When I came across Ethona Active wear and their Gleaming Bralette I was super impressed with not only the quality and modern appeal they brought to their pieces, but the heart and passion behind their company and each and every purchase.

Ethona’s mission statement says it all, “To Inspire Women to Strive for More and Fight for Those Who Can’t.” How does that not make your heart beat right out of your chest?! Their core values are to Inspire, Connect and to Give. Working around the clock to give back to those in need. Ethona has partnered with Saving Innocence to help survivors of human trafficking around the globe. If you would like to support their mission and get your own Ethona Bralette, click here to find out more !

XOX – Cass

Discover more about Ethona here :  Instagram | FacebookWebsite

LEGO of your DIY fears!

Here are 3 DIY’s that will make sure, EVERYTHING IS AWESOME, at your Lego party!

IMG_6587

A few weeks back, I had the privilege of working along side Chalie from Gold’n’Grasses for a very special birthday party for her son. Being an avid lego collector and enthusiast, he wanted to have nothing more than a party that was completely ENGULFED in the LEGO world!

Now, having a small flash back to when I was a child, my brother, sister and I loved and adored all things Lego, we would want nothing more, for any occasion, than to sit and build, create and imagine for hours on end. When I was first approached for this project,  my 6-year-old-Cassandra-heart was jumping for joy and waiting in anticipation for the day this party would come! Just listening to Chalie talk about all she had planned made my heart pitter patter, dreaming alongside her and envisioning what she was about to achieve! And boy, oh boy did his mama deliver!

Continue reading on for FREE printable’s, created by yours truly, and more DIY projects to make your very own LEGO party for your little (or grown up) super fan. I absolutely LOVED being apart of this event with Chalie and being able to help bring her vision to life. I am always looking to collaborate for my next event, whether it be creating or partnering with creators, so don’t be shy! Let’s Chat.

DIY #1 – Lego Building Activity Cards (FREE Printable)

You may also like 40’s Lemonade Stand

Get some creativity going and start the spark of imagination with these fun and customizable Lego Activity Cards. These cards were super simple to make and to create a set that was completely unique to Tristan! (ex: Create a number 5 out of Lego, Create a letter ‘T’ out of Lego, etc.) You can move on to creating favourite things of the birthday girl or boy or even just another item that falls into the theme of the party, ex: Police Station. Enjoy!

Below is a link to your very own set of Lego Activity Cards to use at your next party or even just around the house!! I would love to hear what you come up with for your own set that is unique and customized for your little ones! 

[Click here for LEGO Activity Cards]

___________________________________________________________

DIY #2 City Line Photo Booth Backdrop

This DIY was a 3-part task, now I chose to paint the pieces after I had measured and cut them. I also decided to use spray paint so that made it a lot easier as well! Here is a rough break down of how I made these beautiful, simple but dramatic party decor come to life!

Step 1 : Materials

Find what you are going to use as your base for this project. My hubs went to Costco and grabbed a couple of the pieces of cardboard that sit in-between the giant pallets and brought them home to cut up!  (I used 3 pieces of 3ft x 5ft) You can also use cardboard boxes, diaper boxes, or even head over to Michaels or Staples and pick up black poster board.

Step 2: Trace/Sketch

Sketch out the exact shapes that you would like to cut out – here it is not really a big deal if you mess up or have pencil everywhere. You are going to be painting over it soon, but if you are really unsure, take a sharpie or marker and trace the exact lines so you dont make a mistake while cutting!

Step 3: Cutting

This was the most grueling task for this whole project. I used a cutting board underneath while I used my exacto knife and then later on realized that using scissors would be much easier. Just make sure it’s not the cheap-o version!

IMG_4737

Step 4: Painting

The paint I found the easiest and quickest to use was spray paint, I placed a large piece of plastic on the ground and did 2 coats of black matte spray paint. You could totally do this with a paint brush, I just imagine it taking 5 times longer!

Step 5: Dry & Set up!

IMG_4752

___________________________________________________________

DIY #3 Gift Bag Tags (FREE Printable)

Don’t forget to tag the bag and to say thanks for celebrating the girl/boy of the hour! I designed these awesome tags for Chalie & Tristan to attach to their iconic ‘Money Bag’ goody bags. What an awesome idea, because, well, a bag full of money is a pretty awesome goodie! lol. Follow a long and grab your very own gift tags to use for your next Lego party!

Below is a link to your FREE PRINTABLE for your own gift tags the next time you throw a Lego Party!

[Click here for Lego Favor Bag Tags]

Even MORE Lego DIY’s to keep the party going! 

Lego Twister – Created & Crafted by Chalie at GOLDNgrasses
Diamond Pinata – Created & Crafted by Chalie at GOLDNgrasses

If you haven’t had a chance yet, head on over to Gold’n’Grasses and get the FULL layout and run down here of all the shops involved, other DIY’s you won’t want to miss and photos of her big 5 year old boy!! It was such an enormous joy to not only celebrate Tristan in turning 5, but to work alongside someone who is just as passionate and goal driven to see their dream come to fruition. Chalie my girl, you are a true Gem! And not just because you made an awesome Diamond Pinata! ❤

Happy Birthday Tristan, I hope it was a blast and that EVERYTHING WAS AWESOME!!

Xo Cass

You may also enjoy Ezra’s first Flamingo

If there was anything that Chalie had or used in this party and are worried about finding out where she found the perfect pieces for this Lego theme, look no further! Below are all the links you will need to find the local and creative community that poured in to this event.

Styled & Curated by : Chalie at GoldnGrasses

Photographer  :  Creative Wife & Joyful Worker

​Photo editing: GOLDNgrasses

Venue :  High Street Community Room
Food :  Memphis Blues BBQ
Custom cake & macarons :   Super Sweet Sheep
​Mini mango cheesecakes & white chocolate ganache pudding: The Wooden Whisk
Night out sprinkle mix : Dainty Sprinkle co.
Sugar cookies : Sweeter with a Cookie
Popsicles : Tubify
Cake toppers : Glitter Paper Scissors
Lego printables : Swirl Creative
​Lego head printables : Creative Wife and Joyful Worker (link coming soon)
​Lego activity cards & cityscape & gift tags : Stumbling Grace
Art school speckle large plate & tissue diamonds: Bash Party Goods
Canapé grid plate paper ware :  Heather & Gem
Paper straws & candles :Joonie and Joe
Cups & napkins :EZ party
​Confetti & small ballons : Oh Happy Day! Party Shop
Customized wooden pendant banner :Sprig West
Lego cutlery & party favors : Oriental trading
High five shirt :Lucky Bum Clothing
​Kids tables and chairs :Turkey Party Makers Ltd.
Lego twister DIY : GOLDNgrasses
Diamond piñata DIY : GOLDNgrasses
Lego cop printable : GOLDNgrasses


Creeks, Lakes & Rivers, OH MY! 5 places to stop for a quick bite or mountain dip.

This summer we packed up our teeny tiny KIA Spectra and went on a two and a half week road trip through the interior and made some pre-planned stops and some impromptu stops at some amazing lakes, waterfalls and creeks. Here are my top five that we visited and hope you one day have a chance to experience these same beautiful spots!

LillooetLake3

1. Cayoosh Creek – the perfect picnic spot with an amazing view!

When we stopped off at this beautiful spot, we were travelling from Kelowna to Pemberton. We decided to drive through the Pemberton Canyon, merely for site-seeing and having a little bit of change in scenery on this long drive. While we were going down a long windy road I yelled STOP! Kenz was quite confused, but I just said turn around and away we went. We had passed this beautiful opening of the forest with the mountains and the bridge, it was perfect. (When I was going through my photos, I realized the two middle photos matched up completely – how could I not use them? lol)

Tofino Towel – Lightweight – Flores

Ez’ Dress – Geema Sews

_____________________________________

2. Lilooet Lake – Light walk, Family friendly, Camping available

This was the most eery/creepy/horror movie scene lake I have ever been to! Because of the smoke it created a very different look then what I was expecting to see. Either way it was so cool and we will definitely be going back. My poor husband was so excited and kept telling me, ‘If it was cleared you’d be able to see this. this, and this.’ We made the most of it and Ezra tried out her water shoes for the very first time – she is definitely a water baby!

Tofino Towel – Long Beach – Volume 2

_____________________________________

3. Joffre Lake – Family/Dog friendly, hiking/rock climbing, Camping available

A dream come true! and a HUGE parent bucket list checked off! I have always wanted to go to this lake and do the hike, visit all the stops and for some reason it was always in my head that it just wouldn’t happen, or that it would be a HUGE trip to do it. Alas, when we were planning our route and the stops we’d be taking, Kenz turns to me and says, “You know where we can stop?” with a big goofy grin on his face, “Joffre Lake” OH MAN. was I seeing stars I was so excited!! This big blue beautiful lake did not disappoint! Nor did Mackenzie, as we passed other hikers along the way, they almost all cheered him on for carrying Ezra and saying hello to her. Meanwhile Ezra was yelling at every single ‘DOE-DOE’ (Dog) she saw; there was a lot. She was such a champ, she was so happy the whole way up (all 3 Lakes) and then slept the whole way down, all in the hiking carrier! I am very proud to announce that we did the entire three lakes in 1.5 Hours. I couldn’t believe the sense of accomplishment and empowerment I felt as we stood a the bottom of the glacier. We did it. Having a baby does NOT mean you scale back your passions and adventure, it means you adjust your mind and plans to make it work and thrive in parenthood! We will definitely be returning.

Side note: in the first picture below, yes, that is Ez pointing to the sky because we asked her where the birds were. I love her.

Ez Bonnet – Fawn&Lace

Ez Dress – Geema Sews

Ez Mocs – Wild Ones Mocs

Ez Stripped Shortie – Jax&Lennon

Ez long sleeve ‘Mountain Baby’ – LiveLoveNorth

Tofino Towel – The Flores


_____________________________________

4. Nairn Falls – Light walk & Family friendly

This has to be one of the coolest waterfalls I’ve been to. The size, the power, the closeness of the viewing landing, it was all so good. It’s a small hike up to the falls and I would suggest wearing closed toed and hiking shoes as there was a lot of debris that would not be good for sandals. There is also a large rock face that you have to climb up to get to the viewing spot, you can definitely walk up it – it is no rock climbing by any means, just be prepared with the proper footwear. (The last picture in the group below is what Ez looked like on every hike! She was so curious and full of wonder, holding tight to her bear and sousou, my brave little bean!)

Ez Bonnet – Fawn&Lace

Ez Dress – Geema Sews

Ez Mocs – Wild Ones Mocs

Ez Teal Shortie – Jax&Lennon

Chew Accessory – Baby Bear Design

Tofino Towel – The Flores

_____________________________________

5. Okanagan Lake – Family Friendly/Boat friendly

This lake has to be the one that we spent the most time at, it is the lake that the camp we worked at visits every year a couple times during the week. Unfortunately, the smoke was very thick so I think we only ended up going once so that we could try and keep Ez indoors. While we were there though, Ez had some fun in the water with daddy and they took out her little flamingo floatie and had some time around the corner on the shore where it was a bit more toddler-friendly.

Ez Bathing Suit – Mosie’s Cozies

Tofino Towel – The Flores

I hope you have a chance to visit each of these refreshing spots and enjoy the views, and the work out it takes to get to some of them!

XO – Cass

You may also like : Beach Ready From Head to Tote

Van2San Roadtrip 2015 [Pt.1]

Earlier in the year Mackenzie and I signed up and joined a group from Gracepoint Community Church, to travel to Mexico with One Life One Chance Ministries. We started to plan out our trip, what we would bring, where we were going and how we would get there. The entire team itself was flying down to San Diego and then driving in to Mexico. Mackenzie and I were talking about the trip with some friends one night after a dinner date and we ended up planning an entire road trip with them that centered around Mexico with a road trip on either end of it!


Highlight’s of Van2San Roadtrip 2016
  • Catching a chicken
  • Notebook doodles – pictures
  • Tilamook Cheese Factory + ice cream
  • The Oregon Coast
  • DIY memory cup
  • Devil’s Punch Bowl
  • Oceanside Murals
  • Redwood Forest
  • An engagement

The group of us definitely made the most of this trip and mapped it out accordingly. I am so thankful for Chelsea’s organization skills; our trip, budget and accommodations were all flawless! We started off planning by thinking about the coast, what hot spots we would like to hit and which ones were actually doable, while sticking to a backpackers budget. After all this was decided, we got together,  compared lists and mapped out the route, planning campgrounds, mealtimes and tourist stops.

We were SO grateful to my friend Melissa for opening up her family’s home in Woodenville, Washington for our first night of rest while on the road. When we arrived we were welcomed with open arms, enjoyed some time in their pool and in the morning, walked right out to the chicken coop and grabbed some fresh eggs for breakfast! What a DREAM.

IMG_1013IMG_0981IMG_0988IMG_1015IMG_1016IMG_1022

IMG_1021

Side project I started at the first starbucks we stopped across the border. I kept all my trinkets I found along the way in here!

We were soon on our way  to the coast, stopping in Washington one more time at a park on the side of the Columbia River, it was so beautiful! Overlooking the Columbia River and Astoria just within arms reach.

IMG_5742DSC_9428DSC_9401DSC_9418

DSC_9438

Finally we made it to Cannon Beach! The long awaited and much anticipated beauty. We set up camp at Wright’s for Camping Campground, grabbed a mug of hot cocoa and headed straight for the beach! After constantly looking up Cannon beach on the internet, hearing friends talk about it and watching the rolling, endless waves out the window, I was here! The way people describe it and cameras capture it truly does not do it justice. My toes were in the sand, the wind was in my hair and I didn’t have a care in the world. What a moment of pure bliss.

DSC_9527IMG_5795DSC_9513

IMG_1106

Keep your eyes peeled for more little doodles of add-ons throughout the trip! There’s quite the collection!

You may also like : Beach Ready From Head to ToteIMG_1029

It also did not disappoint that Ryan is very handy with a camera and took these absolutely breathtaking photos of Kenz and I on the beach!

DSC_9484DSC_9480DSC_9479DSC_9506

Our next stop on the map was the Tilamook Cheese Factory, as per Chelsea’s dream and request, but also to our enjoyment. There was so many different styles, smells and variations of cheese here, I didn’t even know this place existed, but thanks to Chels we got to enjoy cheese, ice cream and even some jerky! (One of these pictures you’ll see the first time ‘Operation Donut’ photographed)

DSC_9644IMG_1137DSC_9645IMG_1141

DSC_9637

WAIT FOR IT…..

DSC_9638

….where’s Ryan?

IMG_5887IMG_1145

IMG_1147

OPERATION DONUT

IMG_1129

Tilamook Country Smoker – The boys dream – After venturing through the cheese factory we started to walk towards to car and then we hear, “JERRKKKY” There was a factory beside the Tilamook Cheese Factory called the Tilamook Country Smoker. It was thoroughly enjoyed.

IMG_1134

Devil’s Punch Bowl is part of a state part just outside Otter Rock, Oregon. This view was breathtaking. I had read about this spot before our trip and it once was two separate caves that gave way and became one. It is centered on a large bowl naturally carved in a rock headland which is partially open to the Pacific Ocean. Waves enter the bowl and often violently churn, swirl, and foam. Definitely a site to see and something not to miss when you’re travelling through next time!

IMG_1171IMG_1158DSC_9681IMG_5985DSC_9703DSC_9717DSC_9730IMG_1346DSC_9759IMG_6187IMG_6170

IMG_6182

Port Orford

Welcome to California! We made it! We finally made it! Now off to find the Redwood Forest & Operation Donut – don’t worry it’s coming, you’ll soon find out! Now this forest specifically was another item to check off that I was excited to see and walk through. With trees reaching to the very tippy top of our atmosphere, it’s hard not to feel small, unless you’re hugging one of the infant trees. (Scroll up and check out Kenz and Chels huggin Redwood’s) We ventured on into the forest, looking up, feeling small and hugging every tree in our path.

IMG_1175IMG_6246IMG_1251IMG_1374IMG_1366IMG_6260

DSC_0006

“LOOK! I’m hugging a Redwood” – Chels *Kenz follows along*

DSC_0157


Then there it was, behold, the tree of love. (or as Mackenzie and I knew it; The big ‘O’) time for operation donut to commence. I can’t quite recall who started it but one of the two mentioned climbing up into the tree and taking a picture in it, and Ryan being the gentle-tall-man that he is, offered his hand in marria-err – assitstance to Chelsea. As she was getting settled on her perch, she turned to help Ryan and there he was. Waiting eagerly for her response, Operation Donut was in full bloom, “Will you marry me?” With tear filled eyes, Chelsea says,”GET UP HERE!!”

Now that was intense! Mackenzie and I were set up at different angles to capture the moment for them and there couldn’t have been a better set up because we were already walking through the forest and taking pictures of everything we saw. So climbing up in a big tree was a no-brainer! Excited for these two and their journey together. They are actually to be wed THIS Saturday, we cannot wait to celebrate with them!

DSC_0017DSC_0030DSC_0062IMG_1397IMG_1401

Redwood Forest Campground is where we camped overnight, this is where we enjoyed several card games and left our mark in the table along with many other visitors throughout the years. #VAN2SAN2015

IMG_1445IMG_1412IMG_1414IMG_1418

DSC_0077

Celebrating their engagement with Party Poppers!

IMG_1437DSC_0115DSC_0111

Paul Bunyan & Babe

TRIP CONTINUED ON TO NEXT POST >>> Van2San Roadtrip 2015 [Pt.2]